Balena: Running Containerized Applications on phyBOARD-AM62x

This article was prepared by Atanas Bunchev.

Balena.io, commonly known as Balena, is a platform simplifying IoT device deployment and management. It uses Docker containers for easy application deployment across various embedded Linux devices, offers centralized device management for monitoring and updates, and supports scalability from prototypes to large-scale projects. With over-the-air (OTA) updates and monitoring tools, Balena streamlines IoT application development and management. Balena supports over a 100 device types with robust and resilient remote updates, combined with a powerful toolset for monitoring, maintaining and debugging.

Recently PHYTEC took interest into having their AM62x-based development board added to the list of Balena-supported devices and Konsulko was on the task. The process of bringing Balena support for a new board consists of creating a custom Yocto-based Board Support Repository and having it pass an automated testing procedure run on the actual hardware.

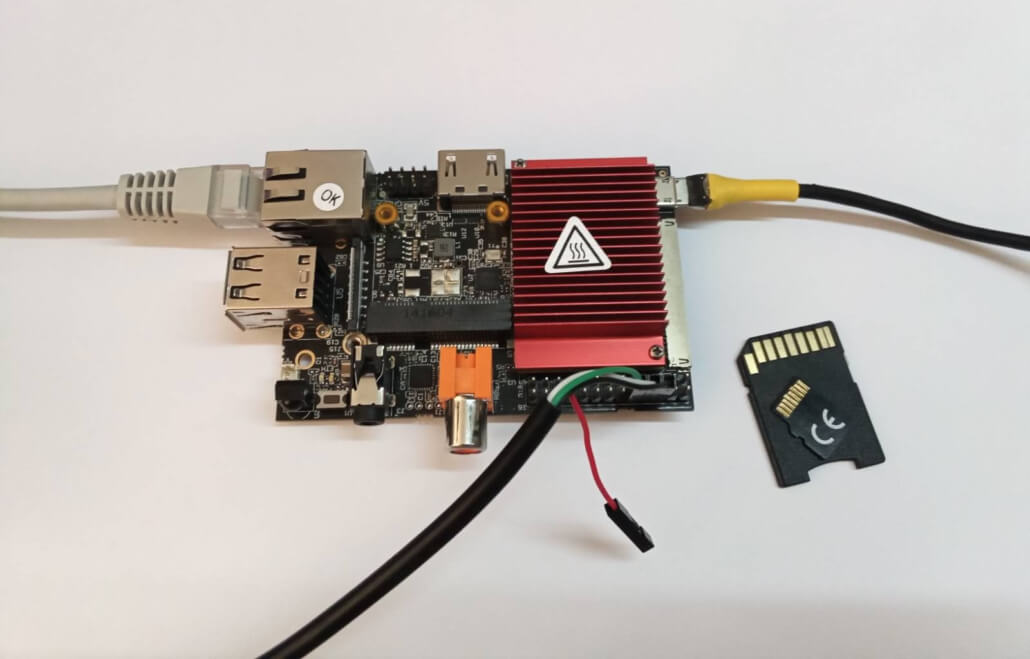
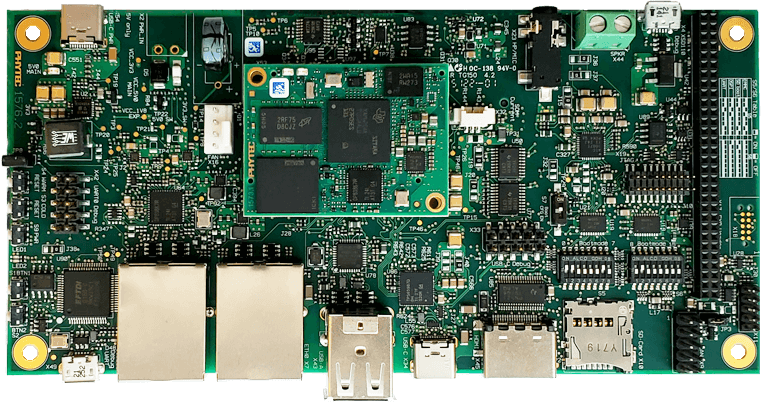
At the heart of the phyBOARD-AM62x is the industrial PHYTEC phyCORE-AM62x. This versatile System-on-Module (SoM) is powered by Texas Instruments AM62x Sitara processor and is equipped with Ethernet, CAN, UART, I2C, SPI, dual display, MIPI CSI-2 camera and audio. The phyBOARD-AM62x offers a modern FTDI interface allowing software download and debugging, perfect for development. Paired alongside the M.2 connectorized WiFi and Bluetooth module extensions makes a perfect product for IoT devices.

Konsulko engineers created balena-phytec git repository which is currently publicly available at the BalenaOS GitHub organization. It is based on the Yocto/OpenEmbedded board support package (BSP) layers meta-ti and meta-phytec. The repository provides all necessary modifications to run BalenaOS (Balena’s specific Linux distribution) on the phyBOARD-AM62x, including a new Yocto/OpenEmbedded integration layer meta-balena-phytec that extends the recipes for the U-Boot bootloader and Linux kernel.

Texas Instruments AM62x SoCs come with a RTI/WWDT Windowed Watchdog Timer which would turn off the board when not serviced within a specific time interval. RTI only supports a windowed mode, where the watchdog can only be petted during the open window; not too early or not too late. However, due to the nature of systemd utilized by BalenaOS, it is unable to ping the watchdog within the designated open window period, as it attempts to ping at watchdog_timeout/2 ticks. Therefore the systemd watchdog has been disabled by a BitBake append file for systemd in layer meta-balena-phytec.

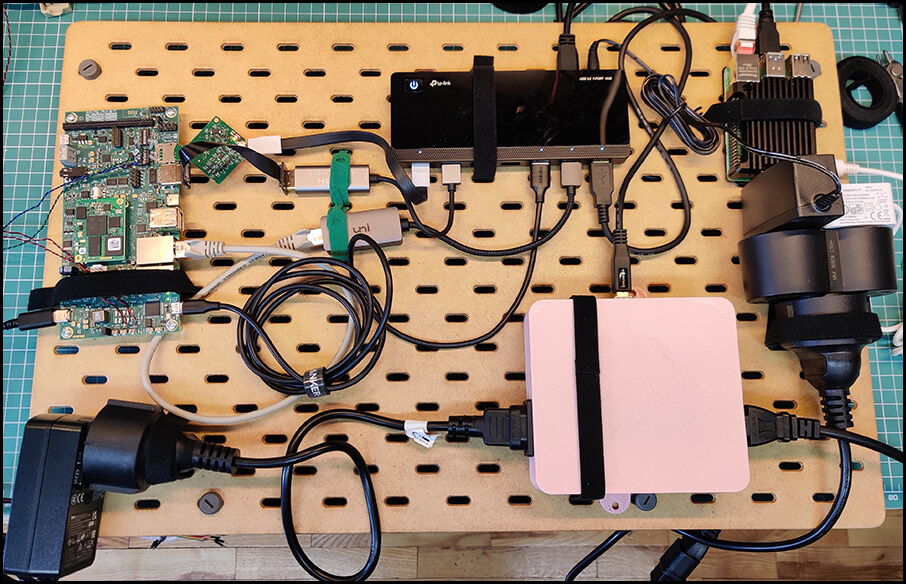
To finish the task Konsulko and Balena engineers ran a special test suite on the board using the Balena AutoKit. Shortened from Automation Kit, the AutoKit is a complete hardware solution for automated interaction with embedded Linux device. It features SD card multiplexing, Ethernet and power control, serial communication, HDMI capture and support for other USB peripherals.

The rest of the article covers a step-by-step guide for connecting the phyBOARD-AM62x to BalenaCloud and deploying a simple containerized application on it, as well as demonstration of some of the basic features provided by BalenaCloud’s Dashboard.

Downloading an Image

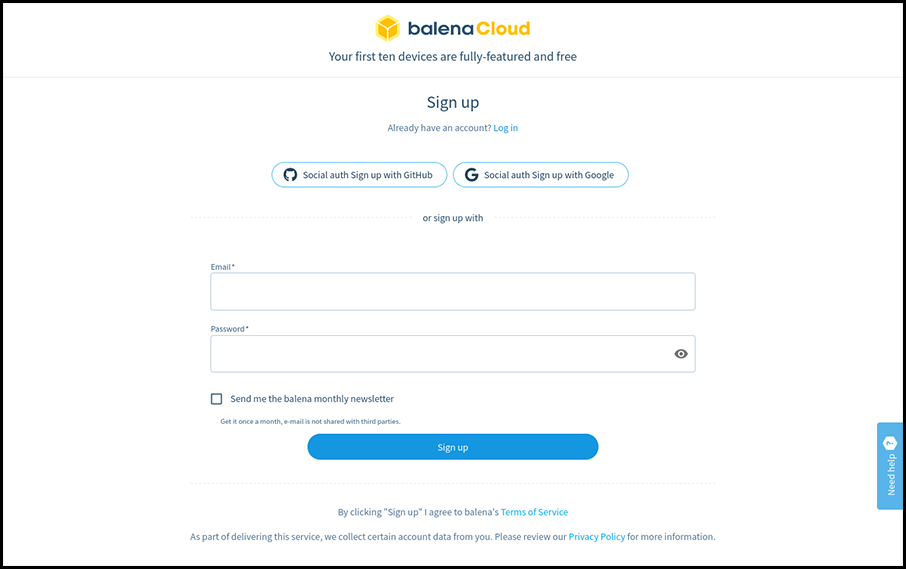
The first thing you have to do is to register at https://dashboard.balena-cloud.com/signup. Every user is allowed to have up to 10 devices with all features enabled for free. While the software that Balena develops is open source, the usage of their cloud infrastructure with more than 10 connected IoT devices requires a plan subscription, with better plans coming with more devices and better support response time.

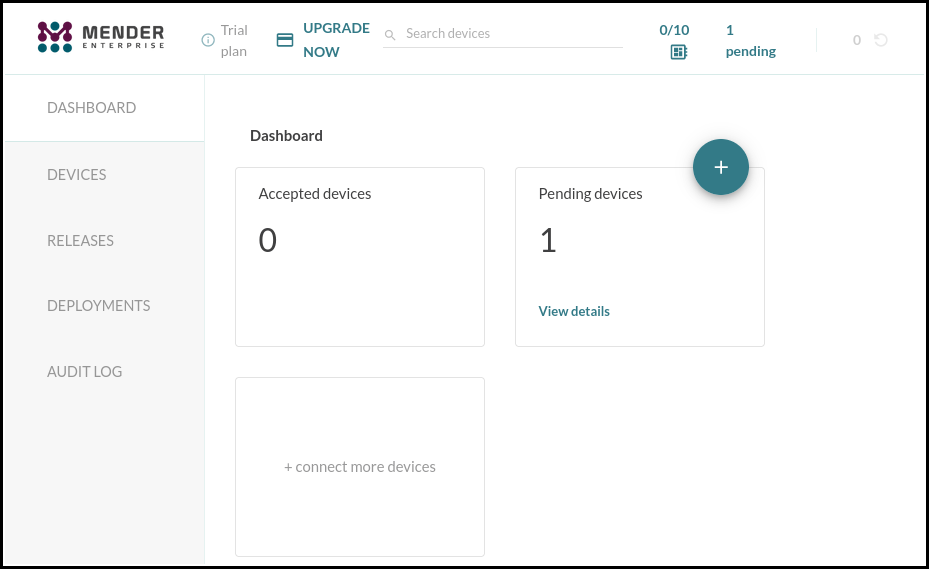
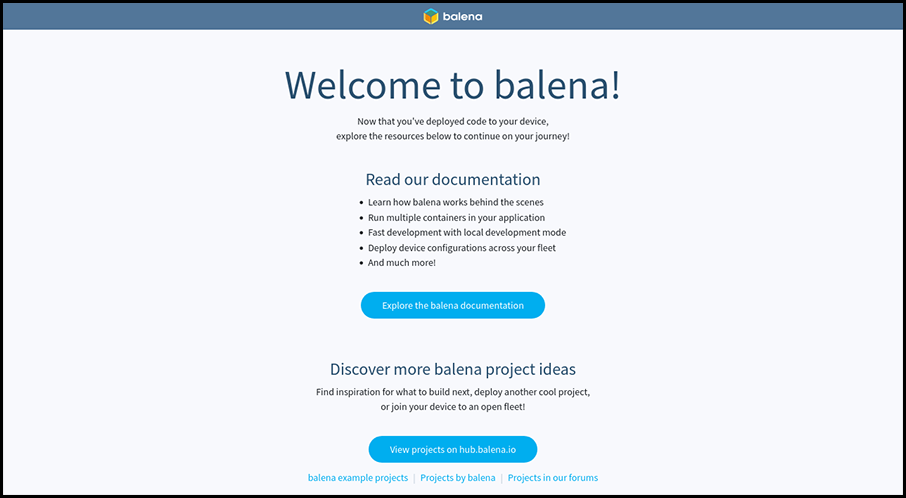
Once you register and confirm your e-mail you’ll be welcomed with a screen providing an introduction to Balena and inviting you to create a fleet.

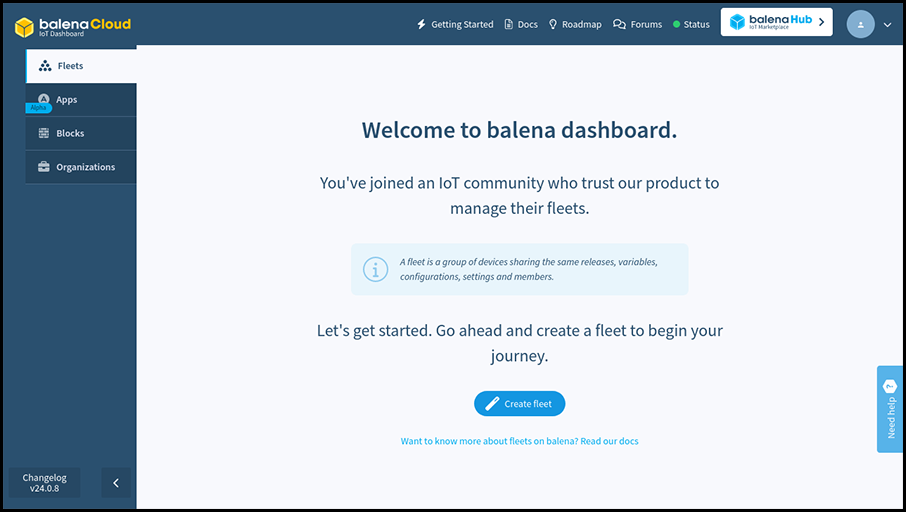
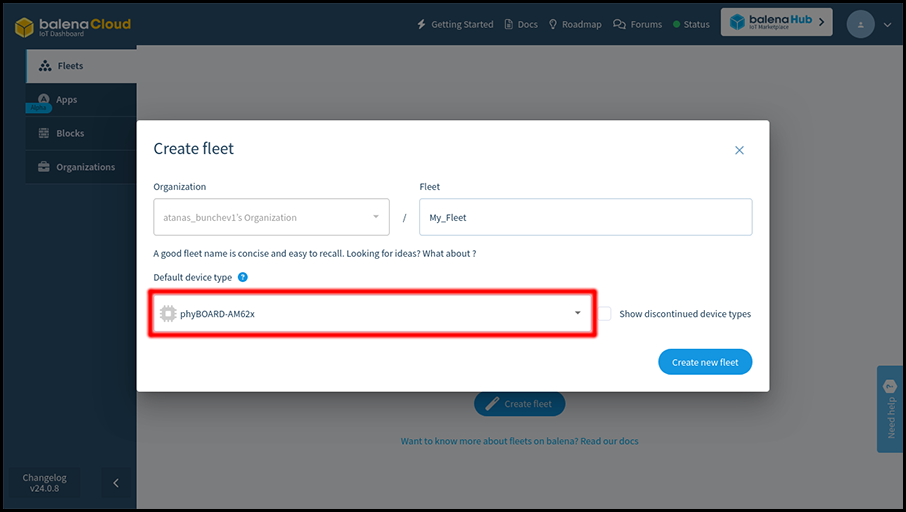
A fleet is a group of devices with identical configuration and with the same applications deployed on them. Create a new fleet and set the device type to phyBOARD-AM62x.

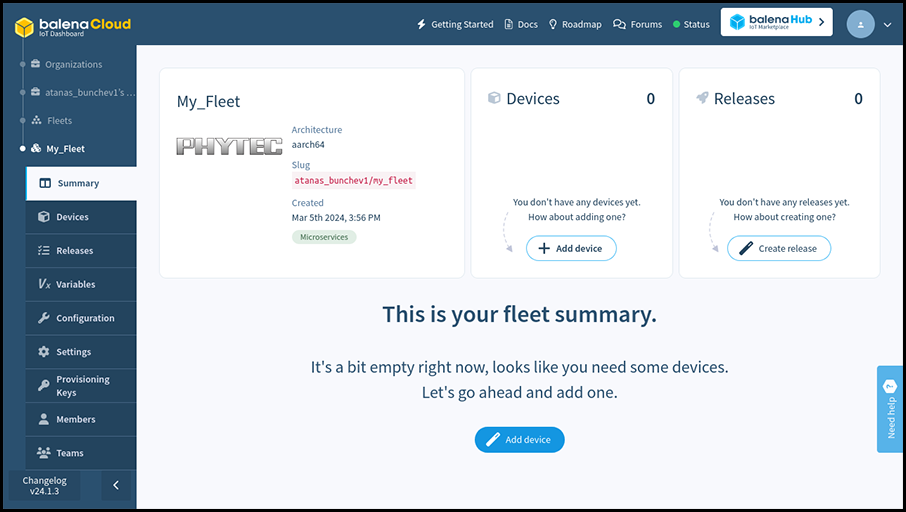
Once your fleet is created click the “Add device” button. Select the Development edition, as it includes a few quality of life modifications for developers, such as passwordless ssh access as root on port 22222.

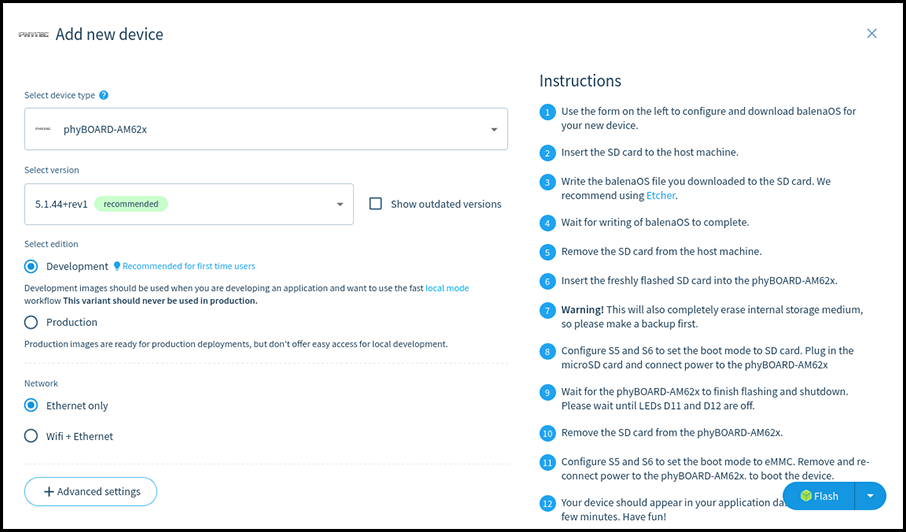
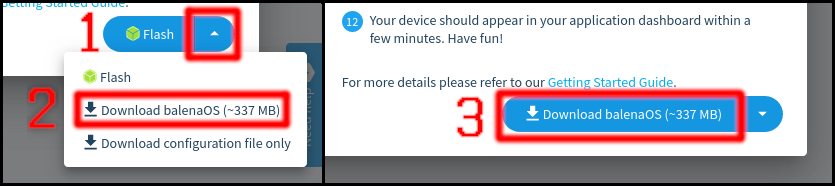
Once you have picked the configuration for the new image you can download it by selecting the Download balenaOS option from the menu next to the Flash button and pressing on that button after that.

Alternatively if you have balenaEtcher installed you can directly click on the Flash button. That way balenaEtcher will start up with the correct URL for the image already selected, leaving only the output device selection to you.

The third option – downloading a configuration file – is applicable when having a custom BalenaOS image that you want to configure for a given fleet.

Flashing the Installation media

Once the image is downloaded you need to flash it on a microSD card. There are several ways of flashing an image. One way is to use a graphical tool for the task, such as balenaEtcher or Rufus (keep in mind that some of these will expect you to unzip the image in advance).

Another way to do is to use the Linux shell. Replace <your_image>.img.zip with the compressed image you downloaded and <your_image>.img with the extracted file. Replace /dev/sdX with the path to the microSD card.

unzip <your_image>.img.zip
umount /dev/sdX*
dd if=<your_image>.img of=/dev/sdX bs=128k status=progress
sync

Keep in mind that flashing an image on a microSD card will delete all data stored on the microSD card.

Installing Balena on the phyBOARD-AM62x

Note: The following procedure will delete all data on the internal eMMC storage of your phyBOARD-AM62x.

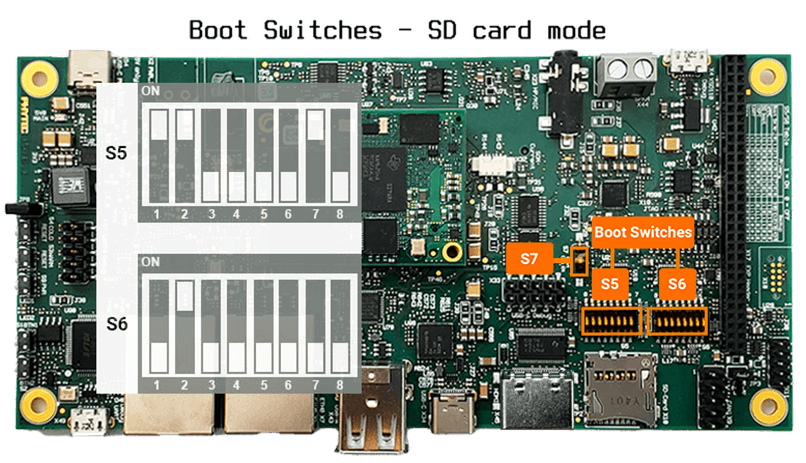
Plug in the newly-flashed microSD card into the phyBOARD-AM62x board. Make sure the boot switches are set to SD card mode. Power on the board and wait for the installation to the internal eMMC to finish.

Once the installation is complete the board will turn off. This is indicated by LEDs D11 and D12 turning off.

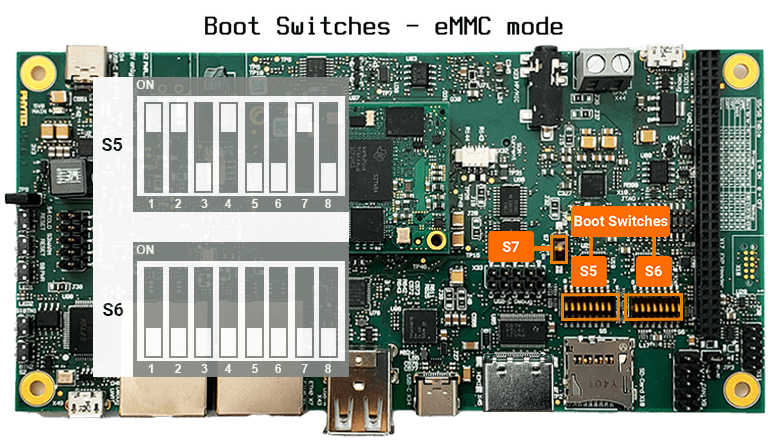
As the installation on the internal eMMC has finished, set the boot mode to eMMC. Disconnect the microSD card, connect phyBOARD-AM62x to Ethernet and power it on.

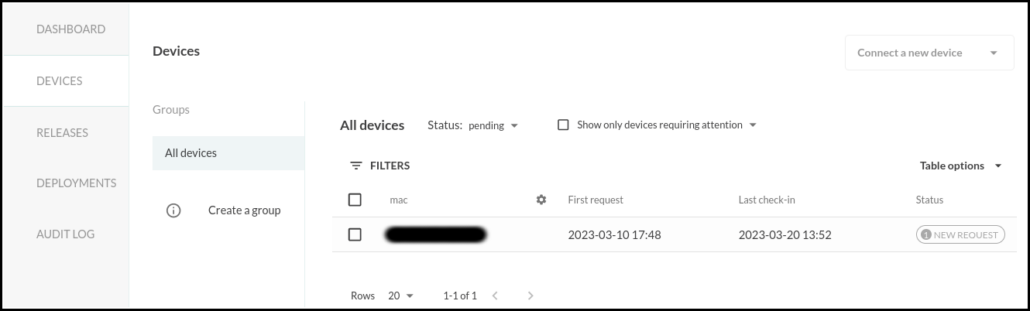
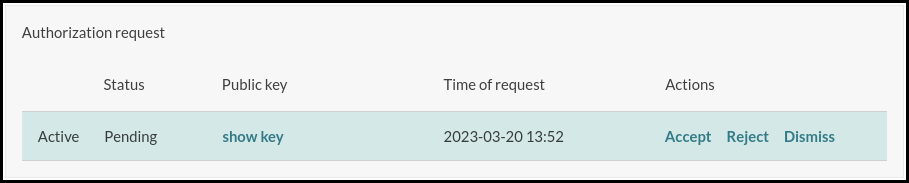
In few moments the board will show up on the fleet page at the Dashboard.

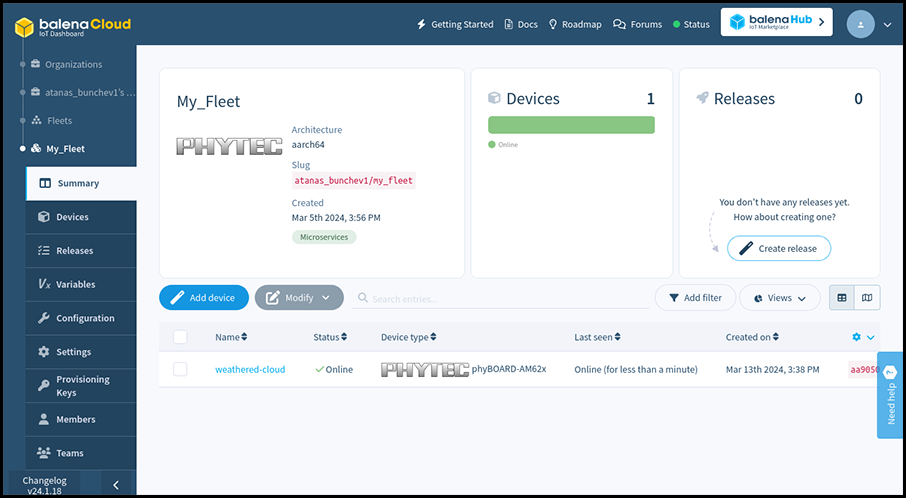
Clicking on phyBOARD-AM62x in the table will open a dedicated page for the board that shows details and current status information.

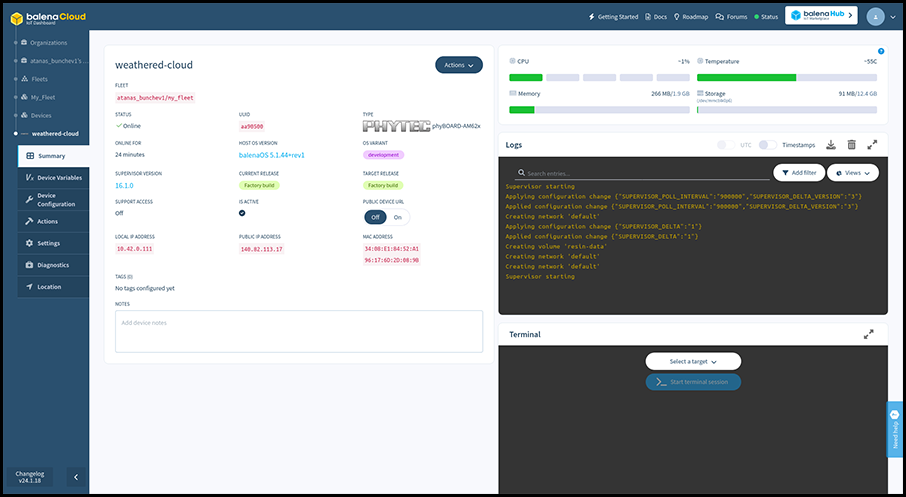
On the left you can see the fleet containing the phyBOARD-AM62x, its online status, its unique UUID, the Host OS and Balena Supervisor versions, the local and public IP address of the board. You can enable or disable the Public Device URL of the board, as well as use the Actions menu to manage the board.

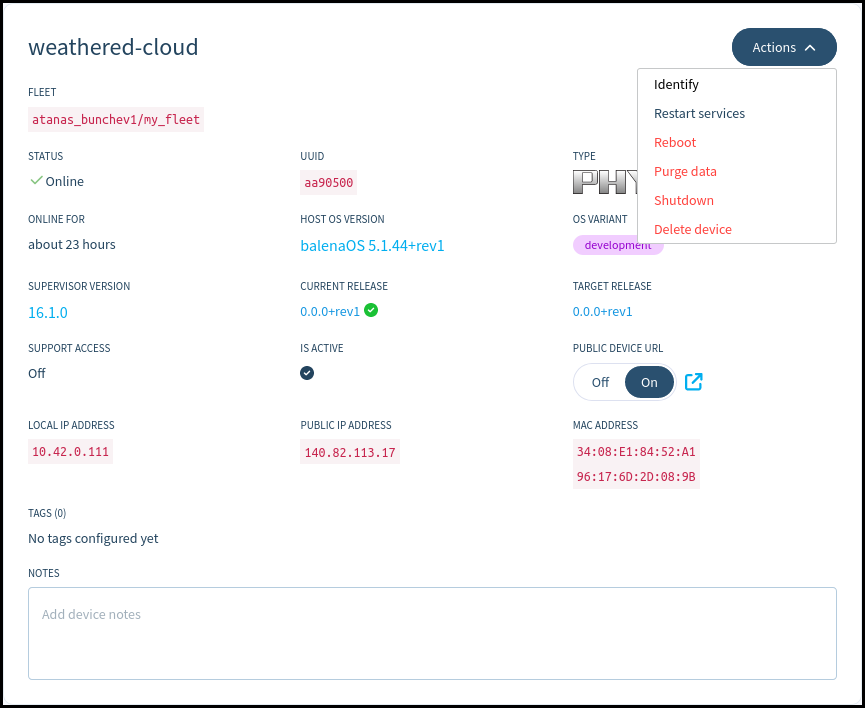
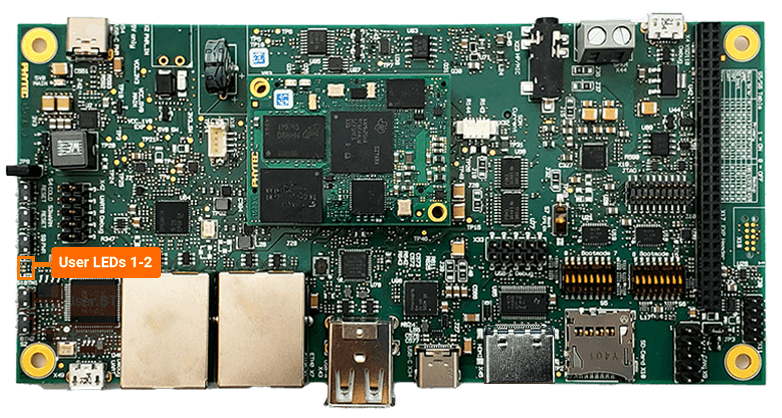
The Identify action will make a specific LED on phyBOARD-AM62x blink for half a minute to make identifying the exact board easier – a very useful feature when having a bunch of similar boards lying around. On phyBOARD-AM62x this is User LED 1, a bright red LED at the left edge of the carrier board.

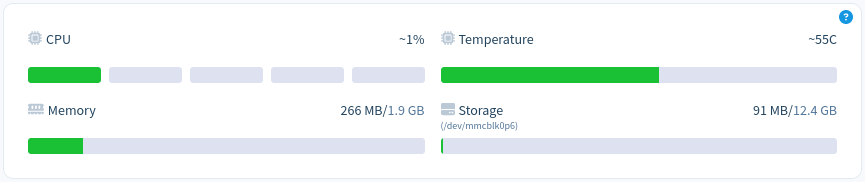
At the upper-right corner you can see the current resource usage on the board, as well as the temperature and free persistent storage space.

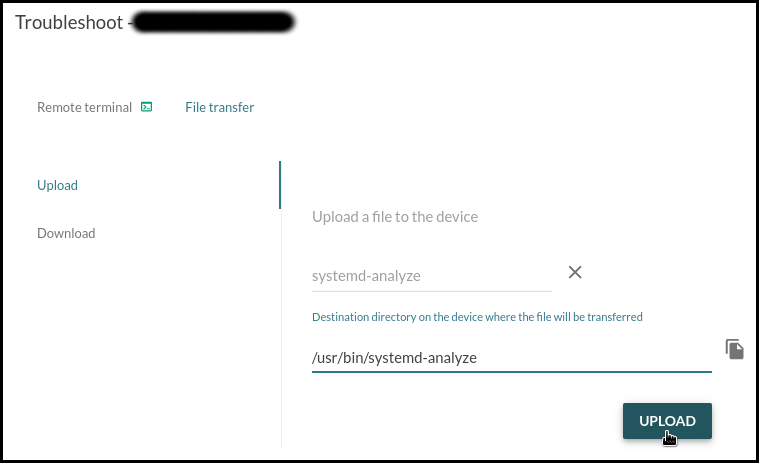
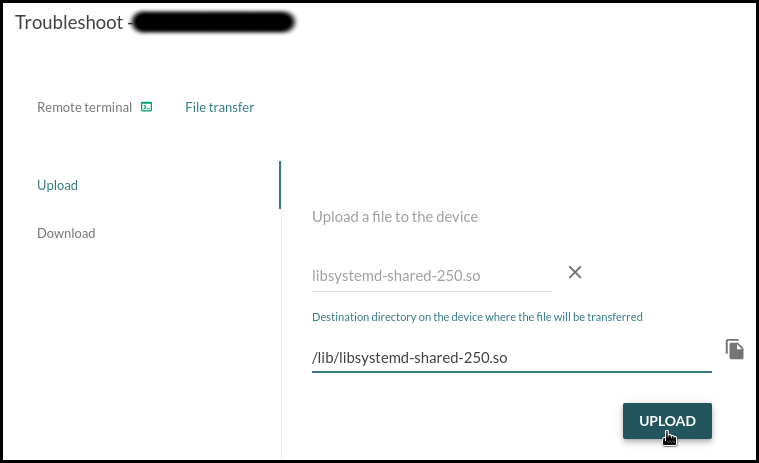
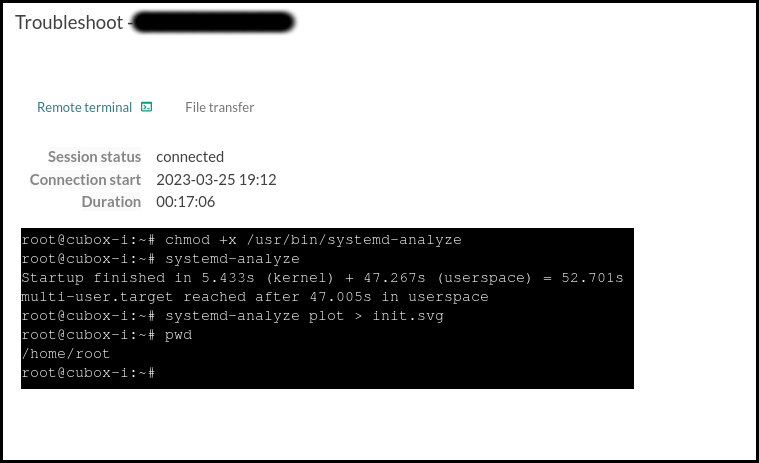
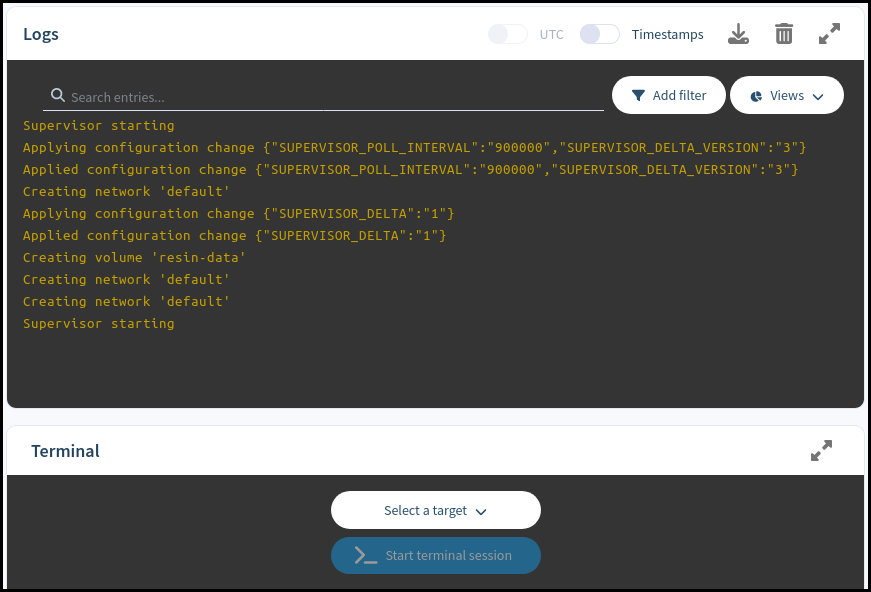
Below them are the Logs and Terminal sections, which can be used for advanced remote debugging and troubleshooting of the board.

Lastly, at the currently empty space at the bottom-left part of the screen we’ll be able to see the status of the containerized applications currently deployed on the board.

Pushing a hello-world application to phyBOARD-AM62x

The last section of this article contains a quick example of how to push a containerized application to a board that runs Balena. The example application that will be deployed is a Docker container consisting of a simple web page hosted with NodeJS Express.

Download Balena CLI tool, a Command Line Interface for balenaCloud or openBalena. Select the standalone binary for your workstation – the machine you’re going to use to deploy the application, not the board you’re going to deploy to.

As of the time of writing, the most recent version is balena-cli-v18.1.5-linux-x64-standalone.zip. If you are utilizing a newer release or a different operating system, kindly substitute the filename accordingly.

unzip balena-cli-v18.1.5-linux-x64-standalone.zip
cd balena-cli

You need to login in your profile from the CLI before you can push anything to your devices. For that task you can use the ./balena login command:

./balena login
 _            _
| |__   __ _ | |  ____  _ __    __ _
| '_ \ / _` || | / __ \| '_ \  / _` |
| |_) | (_) || ||  ___/| | | || (_) |
|_.__/ \__,_||_| \____/|_| |_| \__,_|


Logging in to balena-cloud.com
? How would you like to login? (Use arrow keys)
❯ Web authorization (recommended)
  Credentials
  Authentication token
  I don't have a balena account!

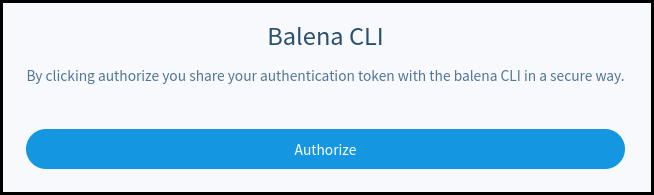
Press Enter to select Web authorization and confirm the authentication request on the web page that opens:

Alternatively, select the Credentials option and insert your username and password.

Once authentication is successful, clone the Hello World sample from https://github.com/balena-io-examples/balena-nodejs-hello-world and push it to your fleet. Replace <fleet name> with the actual name of the fleet that the phyBOARD-AM62x is part of.

git clone https://github.com/balena-io-examples/balena-nodejs-hello-world.git
cd balena-nodejs-hello-world
../balena push <fleet name>

Once the application is uploaded you can see it on the board’s page at the web dashboard.

The Hello World example is a web server hosting a single web page. To check it out, you can either visit the board’s local IP address if you’re in the same local network as phyBOARD-AM62x, or enable the PUBLIC DEVICE URL and open the hyperlink that appears next to the switch once enabled.

This article demonstrates how to setup and use the PHYTEC phyBOARD-AM62x development board with Balena, a container-based distribution designed for easy and rapid development of embedded applications, packed with useful device management and troubleshooting features as well as sophisticated monitoring and automation-oriented ones. Get in touch with us to discuss additional features. Our team is ready to help in development of new or already existing Linux embedded projects.

About Konsulko Group

From the earliest days of OpenEmbedded and the Yocto Project, Konsulko engineers have actively contributed upstream and participated in the community, offering their expertise and guidance in developing high-quality commercial products. Our proficiency extends to Balena, RAUC, Mender, and other open-source solutions, ensuring seamless and reliable over-the-air updates. Contact us to explore how Konsulko engineers can contribute to the advancement of your embedded Linux product development.

___

IMA-measurement with Yocto Project and OpenEmbedded

Integrity Measurement Architecture (IMA-measurement) is a subsystem in the Linux kernel designed to provide a framework for maintaining the integrity of files on a system. The primary purpose of IMA is to ensure that only trusted code and data are executed on a system and that the integrity of critical system components is maintained.

IMA was merged into the mainline Linux kernel in 2004 with the release of version 2.6.30. It evolved over time, adding features such as TPM integration, extended support, and continued maintenance, becoming a key component for ensuring the integrity of files in Linux-based systems. IMA works by calculating cryptographic hashes of files at various points in their lifecycle, such as when they are accessed, executed, or modified.

This article shares the exacts steps to build a minimal Linux distribution with IMA support for QEMU x86-64 using the Yocto Project and OpenEmbedded. The Yocto Project is an open-source collaboration project that enables developers to create lightweight, optimized, and customizable Linux distributions for embedded devices while maintaining control over the software components and configurations included in the system. To enable IMA, we use Yocto/OpenEmbedded layers meta-security and meta-integrity. These layers offer a comprehensive suite of security tools and hardening utilities designed for Linux kernels, along with libraries that facilitate the implementation of robust security mechanisms.

Building a Linux Distribution with IMA

Recently Leon Anavi, Konsulko Group Senior Engineer, contributed a couple of patches to the upstream of meta-security/meta-integrity to simplify using integrity-image-minimal. This is a small image provided as an example to demonstrate IMA support.

The following steps outline the process of building an image with Integrity Measurement Architecture (IMA) using the Yocto Project and OpenEmbedded. This demonstration uses the default debug keys provided in the “data” directory of layer meta-integrity. Because everyone has access to these private keys, for devices in production you must create your own private keys and use them instead. Enabling the audit kernel subsystem provides additional informational integrity auditing messages useful for debugging any appraisal issues that may arise during the development process.

Kindly be aware that this article utilizes source code derived from the primary branches of associated Yocto/OE layers. Consequently, we are selecting specific git commits that have been confirmed to function reliably. These commits will be part of the next long-term support (LTS) release of the Yocto Project which is version 5.0 with codename Scarthgap. It is scheduled for release in April 2024 and will be supported for 4 years until April 2028.

  • Download the source code:
git clone git://git.yoctoproject.org/poky poky-qemu
cd poky-qemu
git checkout e31be0b0e6ed6855787ebfbacc15bdbf1b9e511c
git clone git://git.yoctoproject.org/meta-security
cd meta-security
git checkout 30e755c59204cbd64c3aa12e64ab33041f6f02c0q
git clone git://git.openembedded.org/meta-openembedded
cd meta-openembedded
git checkout 57db42741df341718b9bb4b1b8f20d2e2fcf7010
  • Initialize the built envieronment:
source oe-init-build-env
  • Include additional layers:
bitbake-layers add-layer ../meta-openembedded/meta-oe
bitbake-layers add-layer ../meta-security
bitbake-layers add-layer ../meta-security/meta-integrity
  • Append the following configurations to conf/local.conf:
DISTRO_FEATURES:append = " integrity ima"

IMAGE_CLASSES += "ima-evm-rootfs"

IMA_EVM_KEY_DIR = "${INTEGRITY_BASE}/data/debug-keys"
IMA_EVM_PRIVKEY = "${IMA_EVM_KEY_DIR}/privkey_ima.pem"
IMA_EVM_X509 = "${IMA_EVM_KEY_DIR}/x509_ima.der"
IMA_EVM_ROOT_CA = "${IMA_EVM_KEY_DIR}/ima-local-ca.pem"

IMA_EVM_POLICY = "${INTEGRITY_BASE}/recipes-security/ima_policy_hashed/files/ima_policy_hashed"

SRC_URI:append:pn-linux-yocto = " file://audit.cfg"
CORE_IMAGE_EXTRA_INSTALL += "auditd"

QB_KERNEL_CMDLINE_APPEND:remove:pn-integrity-image-minimal = "ima_policy=tcb ima_appraise=fix"
QB_KERNEL_CMDLINE_APPEND:append:pn-integrity-image-minimal = " ima_appraise=log ima_appraise_tcb integrity_audit=1"
  • Built an image with IMA for QEMU x86-64:
bitbake integrity-image-minimal

Testing IMA

After building the image, we can launch it. QEMU, short for Quick Emulator, is an open-source virtualization software that allows users to emulate various hardware platforms and run operating systems on different host systems. We will use it to run and test the image. By utilizing the “nographic” option, QEMU disables the video console, setting the console to “ttys0”. This feature is particularly beneficial when remotely accessing a build server over SSH. To verify the effectiveness of the appraisal process, attempt modifying a file, then confirm that the verification of the altered file subsequently fails.

  • Launch the image in QEMU:
runqemu nographic
  • Login and root and verify the integrity of file /etc/hostname using evmctl:
evmctl ima_verify /etc/hostname

The expected output should resemble:

Poky (Yocto Project Reference Distro) 4.3+snapshot-e31be0b0e6ed6855787ebfbacc15bdbf1b9e511c qemux86-64 /dev/ttyS0

qemux86-64 login: root
root@qemux86-64:~# evmctl ima_verify /etc/hostname
key 1: 6730eefd /etc/keys/x509_evm.der
/etc/hostname: verification is OK
  • Modify /etc/hostname:
echo test > /etc/hostname
  • Verify the integrity of file /etc/hostname again:
evmctl ima_verify /etc/hostname

Now the verification fails because the file has been modified. The anticipated output should be similar to:

root@qemux86-64:~# echo test > /etc/hostname
root@qemux86-64:~# evmctl ima_verify /etc/hostname
key 1: 6730eefd /etc/keys/x509_evm.der
/etc/hostname: verification failed: 0 ((null))

This simple example serves as a demonstration of how Linux IMA operates, using QEMU as a platform. However, to implement Linux IMA on real-world devices, Konsulko Group offers assistance with hardware bring-up and integration of the suitable Yocto/OE BSP (Board Support Package) layers.

Since the inception of OpenEmbedded and the Yocto Project, Konsulko engineers have actively contributed to the community and provided guidance for developing commercial products. We specialize in U-Boot, Linux kernel, RAUC, Mender, and various other open source projects for embedded Linux devices. Contact us to explore how Konsulko engineers can assist with your embedded product development endeavors.

Integrating RAUC with Yocto Project on BeagleBone Black

Konsulko Group has made many upstream contributions to OTA (over-the-air) update solutions for embedded Linux devices. RAUC is a popular open source option as it has been meticulously developed with a keen emphasis on stability, security, and adaptability. Notably, RAUC seamlessly integrates with major build systems such as Yocto Project/OpenEmbedded, Buildroot, and PTXdist.

Functioning across diverse usage scenarios, one of RAUC’s elementary yet impactful functionalities is the A/B update mechanism. In this setup, two identical root filesystems, denoted as A and B, are maintained. The device boots from one of these, while the other serves as the target for updates.

Post-update completion, the bootloader directs the system to boot from the freshly updated partition during the subsequent system startup. RAUC incorporates the ‘verity’ update bundle format. It extends the capabilities of RAUC by introducing built-in support for HTTP(S) network streaming, adaptive delta-like updates, and comprehensive update bundle encryption.

In previous blog posts, Konsulko Group engineers have demonstrated RAUC on Raspberry Pi and NXP devices such as SolidRun Cubox-i and HummingBoard. Recently Leon Anavi, Konsulko Group Senior Engineer and maintainer of meta-rauc-community ported RAUC to BeagleBone Black.

This article provides, as an example, the exact steps how to integrate RAUC with Yocto Project and OpenEmbedded for booting from a microSD card on BeagleBone Black.

Released in 2013, BeagleBone Black is a single-board computer (SBC) developed by the BeagleBoard.org Foundation. It was certified by the Open Source Hardware Association with OSHWA UID US000236. The chipset on BeagleBone Black is Texas Instruments Sitara AM3358 with 1GHz ARM Cortex-A8 CPU and SGX 3D graphics engine. Because of this the demonstrated integration is a suitable reference for other embedded devices equipped Texas Instruments chipsets.

Required Hardware

The hardware used for this step by step tutorial is:

Building a Linux Distribution with RAUC

RAUC, a robust and powerful open-source solution, demands advanced skills for initial integration. In general, to incorporate RAUC in a Yocto Project and OpenEmbedded image for BeagleBone Black the following actions have to be performed:

  • Use U-Boot as a bootloader
  • Enable SquashFS in the Linux kernel configuration
  • Use ext4 root file system
  • Design specific storage partitioning for the certain use case and configure RAUC accordingly
  • Provide a custom U-Boot script to properly switch between RAUC slots
  • Prepare a certificate and keyring to use for signing and verifying RAUC update bundles.

Leon Anavi has already done all these actions for core-image-minimal in Yocto/OpenEmbedded layer meta-rauc-community/meta-rauc-beaglebone. The layer is available at GitHub. Please follow the steps below to build core-image-minimal for BeagleBone Black with it:

  • Download the long term support (LTS) release Kirkstone reference Yocto distribution, Poky:
git clone -b kirkstone https://git.yoctoproject.org/poky poky-rauc-bbb
cd poky-rauc-bbb
  • Download the meta-rauc layer:
git clone -b kirkstone https://github.com/rauc/meta-rauc.git
  • Download meta-rauc-community layers, including meta-rauc-beaglebone:
git clone -b kirkstone https://github.com/rauc/meta-rauc-community.git
  • Download the meta-openembedded layer as it provides a recipe for nano which will be used for the demonstration:
git clone -b kirkstone git://git.openembedded.org/meta-openembedded

Initialize the build environment:

source oe-init-build-env
  • Include all layers in conf/bblayers.conf:
bitbake-layers add-layer ../meta-openembedded/meta-oe
bitbake-layers add-layer ../meta-rauc
bitbake-layers add-layer ../meta-rauc-community/meta-rauc-beaglebone
  • Adjust conf/local.conf by appending the following configurations to the end of the file:
MACHINE = "beaglebone-yocto"

# Use systemd as init manager
INIT_MANAGER = "systemd"

# Add RAUC to the image
IMAGE_INSTALL:append = " rauc"
DISTRO_FEATURES:append = " rauc"
  • Build a minimal bootable image:
bitbake core-image-minimal

The image creation process from scratch is time-consuming, encompassing various Yocto/OpenEmbedded recipes and configurations. Kindly await completion as bitbake diligently executes each tasks.

  • Flash tmp/deploy/images/beaglebone-yocto/core-image-minimal-beaglebone-yocto.wic.xz to microSD card.
  • Attach the USB-to-UART adapter to BeagleBone Black, plug the ethernet cable and the microSD card.

Press and hold button S2 while plugging in the 5V DC power supply to turn on BeagleBone Black and boot from microSD card.

BeagleBone black board has an onboard button labeled as S2. It is situated near the microSD card slot. Press and hold it while powering the board to boot from microSD card.

  • Verify that the system boots successfully, log in as user root without a password and check RAUC status:
rauc status

On the screenshot BeagleBone Black has been booted from RAUC slot rootfs.0 (A) on the microSD card.

NOTE: The meta-rauc-beaglebone layer includes a core-image-minimal.bbappend file, housing essential configurations for RAUC functionality. Apply these configurations similarly to other images intended for use in your embedded Linux device.

Creating a RAUC Update Bundle

RAUC update bundle comprises the file system image(s) or archive(s) designated for system installation, accompanied by a manifest detailing the images for installation, encompassing options and meta-information. Additionally, it may include scripts designated for execution before, during or after the installation process. To sign and verify the update bundles RAUC uses SSL keys. Layer meta-rauc-beaglebone contains a keyring containing all keys and a recipe for a simple RAUC update bundle for demonstration purposes only.

Follow the steps below to create RAUC update bundle that extends the system by adding the popular text based editor nano:

  • Add to conf/local.conf:
IMAGE_INSTALL:append = " nano"
  • Build the RAUC update bundle:
bitbake update-bundle

Following a successful execution, bitbake will produce the update-bundle-beaglebone-yocto.raucb file.

Updating BeagleBone Black with RAUC

Follow the steps below to update core-image-minimal running from a microSD card on BeagleBone Black:

  • Start a Python 3 web server on the build machine or another computer where the RAUC update bundle (aka update-bundle-beaglebone-yocto.raucb) is available and within the same network as BeagleBone Black, for example:
cd tmp/deploy/images/beaglebone-yocto/
pip3 install --user rangehttpserver
python3 -m RangeHTTPServer
  • On BeagleBone Black replace <IP> with the actual IP address of the computer on which the HTTP server is running and execute the following command to install the update:
rauc install http://<IP>:8000/update-bundle-beaglebone-yocto.raucb

The screenshot show successful installation of the RAUC updated bundle on BeagleBone Black.

  • Reboot BeagleBone Black to load the updated version:
reboot

NOTE: As alternative, instead of using an HTTP server, you can transfer the update bundle to BeagleBone Black and install it from local storage.

  • Verify that nano was added to the system:
which nano
  • Check RAUC status to confirm the system have booted from the second partition:
rauc status

On the screenshot, after sucessful installation of the RAUC update bundle, BeagleBone Black has been booted from RAUC slot rootfs.1 (B) on the microSD card. This slot contains nano.

In real-world product development, the Yocto Project and OpenEmbedded workflow can be enhanced with a few commands for easy implementation of continuous integration (CI).

From the dawn of OpenEmbedded and the Yocto Project, Konsulko engineers have been community contributors and guides for crafting commercial products. Our expertise spans RAUC, Mender, and various open-source solutions for top-notch software updates. Please get in touch with us to discuss how Konsulko engineers can help your own embedded product development.

What to do when your commercial Linux goes away

How do you move forward with your software development when the commercial embedded Linux you’ve used to build your products is no longer available? Customers often come to Konsulko Group for help, particularly when a commercial Linux is phased-out or end-of-lifed.

Konsulko is in a unique position as many of our engineers have 25+ years experience with embedded Linux, and some were instrumental in building the now-discontinued Linux products we are helping our customers replace. We know well what needs to be done (and what doesn’t) and where to look for potential problems along the way. 

We take a three-step approach for our customers. 

  • First, we rebuild their software stack outside the dependencies of the commercial distribution. 
  • This is not a simple task, but when it is done, we have a “clean” software stack that we can update with the latest open source components. 
  • Finally, we systematically address security, OTA and other customizations required by our customer.

The result is customer-specific, fully maintainable embedded Linux that is free of the dependancies of the marketplace. If you would like some help moving forward with your current and future embedded Linux needs, please contact us.

Konsulko Group: The Year in Review 2023

Konsulko Group has had another great year. We’ve helped our customers build new breakthrough embedded products of all sizes, from semiconductors to medical devices to automotive to heavy equipment.

We continue strong relationships with the Linux Foundation, Yocto Project and Automotive Grade Linux. We work with our partners mender.io and PHYTEC, providing support and development for their customers.

Konsulko is growing

We’ve expanded our footprint across the US and Europe, welcoming three outstanding engineers to the team: George McCollister, Darko Alavanja and Bryan Cisneros.

George McCollister has over 25 years of experience in Embedded Systems development. Starting with 8051 microcontrollers and quickly adopting Linux, he has worked on a wide range of technologies from network switches and storage appliances to automated utility fault restoration and process automation. He was a key designer and architect of an industry leading utility automation platform.

Darko Alavanja was deeply involved with robotics as a student, competing in several teams in the Eurobot contest. He designed mechanical components, PCBs, sensor electronics, actuator systems and software used for creating mobile robots. Darko has developed embedded systems for industrial devices such as FPGA-based hardware-in-the-loop equipment, controllers for industrial machinery and protocols for communication gateways.

Bryan Cisneros has developed embedded software, UIs, and test code across various industries, including medical devices, RF modules, and AI-enabled cameras. Before joining Konsulko, Bryan worked in the defense industry developing networked applications for weapons and information systems, focusing on redesigning outdated UIs and programs, and implementing CI/CD pipelines.

Committed to the Open Source community

In addition to our consulting work for our customers, Konsulko Group continues to actively participate in the Open Source community and its conferences around the world.

Konsulko’s senior leadership have been contributors in the Linux kernel and other OSS communities since the late 1990s. The entire Konsulko team has been involved in a number of Open Source projects including U-Boot, Yocto Project, OpenEmbedded and Automotive Grade Linux (AGL).

Konsulko principal engineer Tim Orling serves on OpenEmbedded Board of Directors. He co-presented Maintaining a Community BSP Layer: Updating Meta-Tegra with Ilies Chergui (Medtronic) at Embedded Open Source Summit in June 2023, and Customize your CROPS containers with crops-generator with Eilís ‘pidge’ Ní Fhlannagáin (BayLibre) at Yocto Project Developer Day.

Principal engineer Denys Dmytriyenko and the Yocto Project Technical Steering Committee were instrumental in helping Yocto Project secure important new funding from the Sovereign Tech Fund. Denys also wrote about some of the technical highlights from the 2023 Linux Plumbers Conference.

Principal engineer Scott Murray presented Vehicle Signaling Specification and KUKSA.val at Automotive Grade Linux All Member Meeting Berlin, a “lightning talk” on VSS Updates in AGL at Automotive Linux Summit, Evolving VSS Usage in AGL at AGL AMM Japan, and Automotive Grade Linux: Status and Roadmap at Embedded Recipes Paris.

Senior engineer Leon Anavi spoke about RDP with Wayland, Weston & Yocto at FOSDEM, and Integrating VNC/Weston with the Yocto Project/OpenEmbedded at Yocto Project Virtual Summit 2023.

Vitaly Wool, principal engineer and General Manager, Konsulko AB presented Implementing secure boot for AOSP running U-Boot at the Lund Linux Conference 2023.

Finally, Konsulko Group intern Atanas Bunchev demonstrated remote updates and troubleshooting of connected embedded Linux devices using Mender.io at TuxCon 2023. The presentation (in Bulgarian) spread the word about the Yocto Project, OpenEmbedded and various Mender features among the local community. Atanas also co-wrote (with Leon Anavi) RAUC on CuBox-I/HummingBoard for Software Updates and Mender Add-ons: Remote Troubleshooting Devices in the Field.

Some of the Highlights from Linux Plumbers Conference 2023

In November, Konsulko Group Principal Software Engineer Denys Dmytriyenko attended The Linux Plumbers Conference (LPC), a developer conference for the open source community, held this year in Richmond, Virginia. Here is his report on the highlights of the conference.

LPC brings together the top developers working on the “plumbing” of Linux – kernel subsystems, core libraries, windowing systems, etc. – and gives them three days to work together on core design problems. The conference is divided into several working sessions focusing on different “plumbing” topics, as well as a general paper track.

Usually there are several main tracks and many Microconferences all fit into 3 days. And this year the list included Refereed Track, Kernel Summit, Toolchains Track and BoF. As well as Microconferences on Kernel Testing & Dependability, Real-time and Scheduling, RISC-V, Compute Express Link, Containers and Checkpoint/Restore, Android, Build Systems, Linux Kernel Debugging, KVM, Confidential Computing, Power Management and Thermal Control, Tracing, VFIO/IOMMU/PCI, Live Patching, Rust and Internet of Things.

Due to the number of parallel tracks and Microconferences with a high number of interesting topics, it’s quite impossible to attend all the talks one would like.

Here are just a few that I was able to attend.

Resolve and standardize early access to hardware for automotive industry with Linux

Khasim Syed Mohammed, Texas Instruments

SoC manufacturers are adopting heterogeneous architectures, using MCU cores for safety-critical tasks with RTOS and MPU running Linux for general purpose. Key use cases in the automotive industry, such as quick boot times, early display response, and predictable access to hardware, pose challenges for Linux-based systems. The current solutions of employing heterogeneous processors lack scalability, standardization, and Linux friendliness.

Khasim explored the specific challenges faced by the automotive industry and the existing solutions, addressing the standardization of “Linux late attach” with heterogeneous SoCs. He invited collaboration between automotive OEMs, SoC manufacturers, and Linux kernel/user space maintainers to establish “Linux automotive” standards, enhance the Linux kernel and drivers to meet performance requirements.

Securing build platforms

Joshua Lock, Verizon

Historically, Open Source Software was always built on trust – you trusted the sources, the recipe, the builder to produce the resulting artifacts for a given distro that many use. But with a growing number of attacks on the software supply chain, securing build platforms and providing a verifiable way to link packages back to their sources, as well as specific build instructions used to package and publish them, is becoming very important these days.

Joshua listed several of the big and famous recent supply chain attacks and talked about build provenance being adopted by different players in this field to battle such attacks. He then delved into adoption of the Supply-chain Levels for Software Artifacts, or SLSA (“salsa”) architecture in the Yocto Project and its Autobuilder CI framework – generating provenance during the build as L1 level requirement and signing said provenance at L2 level. While this definitely helps with detecting such attacks, fully securing the software supply chain needs more work.

Improving UAPI Compatibility Review with Automated Tooling

John Moon, Qualcomm

Preserving Linux Userspace API (UAPI) compatibility has been crucial for enabling smooth kernel upgrades without breaking userspace programs. Traditionally, kernel devs relied on code review and testing to catch UAPI-breaking changes.

John showed a new tool they developed at Qualcomm that uses libabigail, letting developers analyze patches for UAPI issues before executing them. This tool could integrate into build systems like OpenEmbedded and the Yocto Project, providing immediate feedback and solidifying the kernel’s UAPI stability policy.

The talk also delved into other interfaces like sysfs and module parameters. However, since libabigail can’t analyze these interfaces directly due to the lack of a clean C API, a couple proposals were presented and sparked a lively discussion with Greg KH and other attendees.

kernel: build system outputs and workflows (and how to balance them)

Bruce Ashfield, AMD

Bruce talked about all the complexities around maintaining and building the Linux kernel in OpenEmbedded and the Yocto Project. All the various inputs, such as vendor BSPs vs. upstream mainline kernel, latest version vs. LTS, different patches, configurations, policies, etc. It gets complicated by additional product requirements, like reproducibility, flexibility, maintenance and support, build speed and so on. And the variety of output end results only adds overhead, when one has to deal with kernel images, modules, DTBs, firmware images, binary packages, debug information, licensing, SBoM manifests, CVE reports, boot components, containers and VMs, SDKs, libc headers, etc. It also differs a bit based on the persona or workflow of one’s building the kernel – developer (kernel vs. userspace), integrator, distributor, contributor or a release engineer.

Trying to keep everyone happy at the same time is almost impossible. Still, linux-yocto, the reference kernel in OpenEmbedded-Core, tries to cover most of the bases and solve as many of the outlined challenges. Bruce talked a bit more about how he maintains linux-yocto, how things are improving over time, where we are heading and opened the floor to discussion.

How big of a problem are Un-upstreamed patches?

Jon Mason, ARM

Build Systems and Distros accumulate local changes against individual components in the form of patches that either fix newly found issues or customize component’s behavior to suit their own requirements. How should those patches be handled and what to do with them? Upstreaming them to be integrated into the future releases of corresponding components is, of course, the best approach. What if it’s not possible or doesn’t happen for other reasons? Is there any structure or process for that? Jon looked at these problems and tried answering the questions from the perspective of the Yocto Project, Buildroot, Debian and other distros.

Building for Heterogeneous Systems

Alejandro Hernandez Samaniego, Microsoft

Heterogeneous systems are widely used in embedded products for better performance, safety, etc. While using different operating systems on various core architectures in a single device is beneficial, each OS has unique dependencies and developer workflows. To optimize development, a single build system should be able to cross-compile different OSs for different architectures simultaneously and Bitbake offers this through its multiconfig feature. Unifying the developer workflow and enhancing the usability of features like multiconfig would significantly improve teams efforts in creating new products.

Alejandro went over examples of setting up multiconfig in the Yocto Project for building bare metal and/or RTOS components along with the general purpose LInux system and integrating final results into a single filesystem image. At the end we discussed some of the remaining challenges and open defects with some of the aspects of multiconfig, like separating temp directories, SDK coverage, etc.

A kernel documentation update

Jonathan Corbet, LWN.net

Jonathan provided an update on the recent changes in the Linux kernel documentation – restructuring of architecture-specific docs, new Rust documentation, added new translations, new theme for HTML-rendered pages, texinfo support, lots of new docs were added, rework of the top-level index.rst, etc. He also commented on some of the future plans, such as reworking of device-related docs, which are now spanned across 31 subdirectories, and adding more structure to the rest of areas in the documentation.

A lively debate was sparked around plain text vs. HTML and format of the docs in general, e.g. plain text is still preferred by some kernel maintainers over HTML, but adding RST markup to the input text files makes them less readable. Sphinx and tooling were then discussed, build-time improvements, support for partial builds to speed things up, etc.

Embedded Linux BoF

Tim Bird, Sony

Tim led an open discussion session covering different aspects of embedded Linux, such as Architectures, Bootloaders, Boot time, Filesystems, Networking, Security, Testing, Tools, Toolchains, Tracing, System Size and Build Tools and Distros. He mentioned latest updates to U-boot, referenced earlier talk by Khasim on reducing boot time by offloading some tasks to MCUs and deferring non-critical device probing to later time in user-space.

For size reduction he listed removal of SLOB and planned removal of SLAB. But as Arnd Bergmann, kernel developer and arm-soc tree maintainer commented, system size may no longer be relevant, as memory becomes cheaper and ARM manufacturers actively switching from 32-bit to 64-bit solutions, while small footprint systems are relegated to Zephyr. On the other hand, nolibc allows building very small statically-linked binaries for Linux.

Finishing up with closing remarks about the Embedded Linux Community with shoutouts for mailing lists, different Organizations and Projects operating in this field, popular upcoming events and the state of eLinux wiki losing its funding soon.

Zephyr Retro-and-Prospective: Project Growth, Long Term Support, and Linux Interoperability

Chris Friedt, Meta

Chris’ lightning talk quickly went over Zephyr’s brief, but very rich and rapidly-changing history. Added new architectures, 64-bit support, new protocols, new boards, Device Tree API, TF-M, LLVM and other toolchains, Power Management, USB-C/PD, DSP subsystem and many more features and improvements. Many bugs were fixed, new maintainers and contributors joined. All in all Zephyr enjoyed tremendous growth in recent years.

Challenges in Device Tree Sync – kernel, Zephyr, U-boot, System DT

Nishanth Menon, Texas Instruments

These days Device Tree is commonly used to describe the hardware in different ecosystems, such as Linux kernel, U-boot and Zephyr. But each ecosystem has its own goals and limitations and along with limited standardization of Device Tree description of hardware that results in very different user/developer experiences and challenges keeping them in sync.

With a BeaglePlay board using TI AM625 heterogeneous SoC, Nishanth was hoping to blink one LED from A53 core running Linux and blink another LED from M4F core running Zephyr, all described by the same Device Tree. But it wasn’t as simple – he showed examples of different Device Trees describing the same hardware from the perspective of Linux kernel, U-boot bootloader and Zephyr RTOS. The Linux kernel has A53-centric view, while U-boot also focuses on R5F core taking care of the initial boot, along with binman and bootph specifics, where Zephyr diverges from both of them due to its focus on performance and resource constraints, utilizing C headers generated from the Device Tree.

There are some other differences between ecosystems using Device Tree, such as licensing, bindings, firmware usage and tooling. But one of the proposed solutions to unify the above inconsistencies was a lopper tool and the use of a common/canonical System Device Tree with personality overlays that produces required device-specific views.

Konsulko Group in Paris at Embedded Recipes 2023

Three Konsulko engineers traveled to Paris (left to right, in créatif senior Frank Tizzoni‘s great caricature): António Oliveira came from Portugal, Darko Alavanja from Serbia, Scott Murray from Canada.

Embedded Recipes was held over two days in late September at Fondation Biermans Lapotre. The event had a nice format: single room, single track. That meant everyone stayed together for its duration which made it easier to meet people.

We talked a little about everything: kernel internals, prototyping tools, software updates, Yocto Project, machine learning…

Scott gave a nice overview of the Automotive Grade Linux project, its history, current work and future plans.

Mender Add-ons: Remote Troubleshooting Devices in the Field

(This article was written by open source software enthusiast and Konsulko Group intern Atanas Bunchev, working with Konsulko Senior Engineer Leon Anavi.)

Konsulko Group often works with Mender.io to provide secure, risk tolerant and efficient Over-The-Air updates for any software on an embedded device. This includes both solutions for robust system updates as well as updates of single applications. Mender is compatible with any Linux based OS, including popular build systems such as Yocto Project/OpenEmbedded, Buildroot and OpenWrt.

Aside from OTA updates Mender also offers several add-ons. These are optional extensions that provide functionality for use cases beyond the core OTA updates features.

One such use case is remote troubleshooting. In practice deployed devices in the field are often hard to reach or retrieve. Troubleshooting individual devices becomes resource inefficient and in some cases they have to be replaced even when it’s just a small software or configuration issue. Our experience has shown in these situations Mender’s Add-ons have proven to be extremely useful.

This article provides as an example, the exact steps how to integrate Mender with The Yocto Project and OpenEmbedded for SolidRun CuBox-I and HummingBoard as well as a demonstration of the Mender Troubleshooting package, more specifically the File Transfer and Remote Terminal Add-ons. With the File Transfer add-on files can be downloaded and uploaded to any accepted device. Remote Terminal add-on allows remote interactive command execution from the Mender UI.

These add-ons are very valuable for system administration and mantainance of Internet of Things or fleets of connected industrial devices. For an example, we will troubleshoot an embedded Linux device remotely with systemd using Mender add-ons. We will upload tools to gather system boot-up performance statistics, run them on the device thanks to the Remote Terminal and download logs for further debugging.

Any Mender enabled device is suitable for this demonstration. Recently the Konsulko Senior Engineer Leon Anavi ported Mender to SolidRun CuBox-I and HummingBoard with NXP i.MX6 SoC so our current setup is based on this hardware platform and Yocto LTS release Kirkstone. Earlier we also ported RAUC, an alternative free and open source OTA update platform to the same hardware. If you are interested in software updates, please contact us to discuss your own embedded product needs in details. The hardware used in this example is:

  • HummingBoard Pro board
  • 32GB microSD card
  • Generic RJ45 network cable with Internet connection
  • Optionally UART to USB adapter for debugging the setup section

Building a Linux Distribution with Yocto/OpenEmbedded

The Mender Community provides a set of examples for integration with various hardware platforms using Yocto/OpenEmbedded in the meta-mender-community repository. Sub-layer meta-mender-nxp in this repository contains the integration for Cubox-I/HummingBoard.

The meta-mender-nxp layer uses Google Repo to provide easy and simple setup and build process for the examples:

$ mkdir mender-nxp && cd mender-nxp
$ repo init -u https://github.com/mendersoftware/meta-mender-community \
            -m meta-mender-nxp/scripts/manifest-nxp.xml \
            -b kirkstone
$ repo sync
$ source setup-environment nxp

Board configuration

To configure the build system we have to append to conf/local.conf inside the build directory.

First we are going to set the build target machine:

MACHINE = "cubox-i"

Then we have to accept the end user agreement required by the BSP layer:

ACCEPT_FSL_EULA = "1"

Note: Usually to enable Mender’s Troubleshooting features we have to add mender-connect to IMAGE_INSTALL. In our case this is already added by the meta-mender-demo layer.

Mender configuration

We have to provide our device with MENDER_SERVER_URL and MENDER_TENANT_TOKEN.
For that reason we have to register at https://mender.io/.

Mender provides a free demo profile with limitation of 1 year and up to 10 devices which can be used to experiment with all of Mender’s features.

In fact, when sourcing the setup-environment script we get most of the mender-specific configuration appended to local.conf. This includes a description of how to get our tenant token:

# Build for Hosted Mender
#
# To get your tenant token:
#    - log in to https://hosted.mender.io
#    - click your email at the top right and then "My organization"
#    - press the "COPY TO CLIPBOARD"
#    - assign content of clipboard to MENDER_TENANT_TOKEN
#
#MENDER_SERVER_URL = "https://hosted.mender.io"
#MENDER_TENANT_TOKEN = ""

Note: If using the European server one has to set MENDER_SERVER_URL = "https://eu.hosted.mender.io"

Once we assign our tenant token and remove the # in front of MENDER_SERVER_URL and MENDER_TENANT_TOKEN we’re ready to build our system.

Building and flashing the system image to a microSD card

Build an example image with Yocto:

$ bitbake core-image-base

Building an image from scratch is a long process involving a lot of tasks. Please patiently wait until bitbake completes all tasks.

Once the build is complete flash the image to the microSD card (replace /dev/sdX with the proper device path) and boot it on the HummingBoard:

$ bmaptool copy tmp/deploy/images/cubox-i/core-image-base-cubox-i.sdimg.bz2 /dev/sdX
$ sync
$ eject /dev/sdX

Connecting to Mender

Once the board finishes booting it will poll the Mender server. By design the connection has to be established from the board to the server. Mender does not open any ports on the board to provide better security therefore the device has to initiate the connection.

When the connection is established the Mender control panel will indicate one pending device.

To accept the request click on View details under Pending devices.

Select the new device and press accept in the Authorization request section.

Once the connection is accepted head over to the Troubleshooting tab in the Device information section. Here you can launch a remote terminal and transfer files.

The next part of the article will demonstrate preparing, uploading and using systemd-analyze to fetch data about the boot process.

Preparing troubleshooting software

To compile systemd-analyze we have to add it to our image in conf/local.conf:

IMAGE_INSTALL:append = " systemd-analyze"

Rebuild systemd to get the systemd-analyze binary:

$ bitbake systemd -c compile
When using the do_compile command Yocto/OpenEmbedded will preserve the compiled binaries.

Find the systemd-analyze binary and libsystemd-shared-<version>.so shared library:

$ find tmp/work -name "systemd-analyze"
$ find tmp/work -name "libsystemd-shared*.so"

Note: As of the time of writing of this article these files should reside in locations similar to ./tmp/work/cortexa9t2hf-neon-poky-linux-gnueabi/systemd/1_250.5-r0/build/systemd-analyze and ./tmp/work/cortexa9t2hf-neon-poky-linux-gnueabi/systemd/1_250.5-r0/build/src/shared/libsystemd-shared-250.so. These paths depend on the exact version of systemd as well as the build configuration and may not be correct in your case.

Uploading the troubleshooting software

Upload these files to the board using Mender’s File Transfer utility:

  • systemd-analyze into /usr/bin/
  • libsystemd-shared-<version>.so into /usr/lib/

Fetching service initialization logs

Once the troubleshooting software is uploaded we can use the Remote Terminal to execute it.

Permit execution of the systemd-analyze binary:

# chmod +x /usr/bin/systemd-analyze

Check the time it took for the system to initialize:

# systemd-analyze

Export a graphic of all enabled services and the time they took to initialize:

# systemd-analyze plot > init.svg

Download init.svg:

This graphic shows that the device needs around a minute to reach multi-user.target. The longest task is the resizing of the /data partition that runs on first boot and the second longest is the filesystem check for mmcblk1p1 that runs every time the system boots.

Here is another graphic generated after a reboot:

This article demonstrates how to use Mender’s Remote terminal and File Transfer troubleshooting utilities to upload and execute the systemd-analyze binary to profile the initialization process of systemd services. These troubleshooting utilities can be used for variety of different tasks. After debugging a single device and finding an appropriate fix, Mender is capable of performing an A/B or delta software update to all devices or specific group of devices in the field.

Since the earliest days of the OpenEmbedded build framework and the Yocto Project, Konsulko engineers have been contributing to the community and helping customers build commercial products with these technologies. We have experience with RAUC, Mender and other open source solutions for software updates. Please contact us to discuss your own embedded product needs.

Setting up RAUC on CuBox-I/HummingBoard for Software Updates

(This article was written by open source software enthusiast and Konsulko Group intern Atanas Bunchev, working with Konsulko Senior Engineer Leon Anavi.)

RAUC is one of the popular solutions that provide OTA (over-the-air) updates for Embedded Linux devices. RAUC is developed with focus on stability, security and flexibility and is compatible with all popular build systems: The Yocto Project/OpenEmbedded, Buildroot and PTXdist.

RAUC is capable of covering various use cases the most simple one being A/B updates.

The A/B updates scenario consists of having 2 identical root filesystems (named A and B), booting from one of them and performing the update on the other. After the update is complete the bootloader will boot from the updated partition on the next system boot. Recently the ‘verity’ update bundle format was introduced in RAUC. This new groundbreaking feature improves the verification process and most importantly allows extending RAUC by built-in HTTP(S) network streaming support, adaptive delta-like updates, and full update bundle encryption.

This article provides an example for setting up RAUC for A/B updates scenario on a HummingBoard board. The hardware used for the example is:

  • HummingBoard Pro board
  • 32GB microSD card
  • UART to USB adapter

RAUC is a robust, powerful and flexible open source solution that requires advanced skills for initial integration. To use RAUC in an image built with the Yocto Project and OpenEmbedded for CuBox-I/HummingBoard one needs to:

  • Use U-Boot as a bootloader
  • Enable SquashFS in the Linux kernel configuration
  • Use ext4 root file system
  • Design specific storage partitioning for the certain use case and configure RAUC accordingly
  • Provide a custom U-Boot script to properly switch between RAUC slots
  • Prepare a certificate and keyring to use for signing and verifying RAUC update bundles.

Building a Linux Distribution with RAUC

I’ve recently contributed to meta-rauc-community, a repository containing minimal RAUC example layers for Yocto/OpenEmbedded.

The following steps will show how to use the meta-rauc-nxp layer from that repository to build and update a minimal Linux distribution. The update will install nano (the text editor) to the system.

Download the reference Yocto distribution, Poky.
We’ll use the latest long term support version, kirkstone.

$ git clone -b kirkstone https://git.yoctoproject.org/poky
$ cd poky

Download meta-rauc-community layers (meta-rauc-nxp):

$ git clone https://github.com/rauc/meta-rauc-community.git

Download the meta-rauc layer:

$ git clone -b kirkstone https://github.com/rauc/meta-rauc.git

Download the BSP layers for cubox-i/HumminbBoard boards:

$ git clone -b kirkstone https://git.yoctoproject.org/meta-freescale
$ git clone -b kirkstone https://github.com/Freescale/meta-fsl-arm-extra.git

Download the meta-openembedded layer (provides nano):

$ git clone -b kirkstone git://git.openembedded.org/meta-openembedded

Initialize the build environment:

$ source oe-init-build-env

Add the layers to conf/bblayers.conf:

$ bitbake-layers add-layer ../meta-openembedded/meta-oe
$ bitbake-layers add-layer ../meta-rauc
$ bitbake-layers add-layer ../meta-freescale
$ bitbake-layers add-layer ../meta-fsl-arm-extra
$ bitbake-layers add-layer ../meta-rauc-community/meta-rauc-nxp

Adjust conf/local.conf by adding the following configurations to the end of the file:

# HummingBoard specifications are very similar to Cubox-I
MACHINE = "cubox-i"

# Accept end user agreement required by the BSP layer.
ACCEPT_FSL_EULA = "1"

# Use systemd as init manager
INIT_MANAGER = "systemd"

# Add RAUC to the image
IMAGE_INSTALL:append = " rauc"
DISTRO_FEATURES:append = " rauc"

# Generate ext4 image of the filesystem
IMAGE_FSTYPES:append = " ext4"

# Use the file containing the partition table specification
WKS_FILE = "sdimage-dual-cubox-i.wks.in"
WKS_FILES:prepend = "sdimage-dual-cubox-i.wks.in "

# Add 150 000 KBytes free space to the root filesystem
# (Adding software with updates require space.)
IMAGE_ROOTFS_EXTRA_SPACE:append = " + 150000"

# Add the boot script to the boot partition
IMAGE_BOOT_FILES:append = " boot.scr"

Note that whitespace inside quotes is intentional and important.

To sign and verify the update bundles RAUC uses SSL keys. A keyring containing all keys that will be used for update bundles needs to be installed on the target.

meta-rauc-community provides a script that would generate example keys and configure the current build environment accordingly. (The script has to be called after sourcing oe-init-build-env)

$ ../meta-rauc-community/create-example-keys.sh

Build a minimal bootable image:

$ bitbake core-image-minimal

Building an image from scratch is a long process involving a lot of tasks. Please patiently wait until bitbake completes all tasks.

It’s strongly recommended to zero-fill the u-boot environment sectors before flashing the image on the microSD card (replace /dev/sdX with the proper device path):

$ dd if=/dev/zero of=/dev/sdX seek=2032 count=16

After the build is done, flash the image to a microSD card (replace /dev/sdX with the proper device path) and boot it on the HummingBoard:

$ bmaptool copy tmp/deploy/images/cubox-i/core-image-minimal-cubox-i.wic.gz /dev/sdX
$ sync
$ eject /dev/sdX

Attach the USB-to-UART adapter to the HummingBoard Pro, plug the ethernet cable and the microSD card. Turn on the board to verify that the system boots successfully.

By default one can login as root without password.

Creating an update bundle for RAUC

After sourcing the oe-init-build-env, append the following line to the build configuration conf/local.conf to add nano to the system:

# Adding nano
IMAGE_INSTALL:append = " nano"

Build the RAUC update bundle:

$ bitbake update-bundle

Start a web server:

$ cd tmp/deploy/images/cubox-i/
$ pip3 install --user rangehttpserver
$ python3 -m RangeHTTPServer

Now you can install the bundle on the board, then reboot:

# rauc install http://192.168.1.2:8000/update-bundle-cubox-i.raucb
# reboot

One of the latest RAUC features is the verity bundle format. This format allows updates to be done without storing the whole bundle on the device in advance, which is useful for devices with limited space. One of the requirements for this feature is hosting the bundle on a server that supports HTTP Range Requests.

As alternative, you can transfer the bundle to the device and install it from local storage.

Verify that nano was added to the system:

# which nano

Check RAUC status to confirm the system have booted from the second partition:

# rauc status

For real-world products, this build procedure with the Yocto Project and OpenEmbedded can be optimized further with just a few commands for easy implementation of continuous integration (CI).

Since the earliest days of the OpenEmbedded build framework and Yocto Project, Konsulko engineers have been contributing to the community and helping customers build commercial products with these technologies. We have experience with RAUC, Mender and other open source solutions for software updates. Please contact us to discuss your own embedded product development.

Konsulko Group: The Year in Review 2022

2022 went by quickly with Konsulko engineers working closely with our customers, our partners and the open source community. For the tenth straight year, Konsulko Group has helped our clients build outstanding commercial products with Embedded Linux, Yocto Project and OpenEmbedded, as well as deploying Over-the-Air (OTA) software updating.

Engaging with our customers

We had particular success with our Konsulko Continuous Time Engagement™ offering, providing dedicated engineering resources for two of the world’s largest semiconductor companies. This model provides guaranteed engineering time for an agreed period. KCTE has allowed our customers to use our engineers on a variety of their requirements, and switch between these tasks as the rest of their project and in-house engineering required.

Of course, many of our clients prefer Konsulko OnDemand Time Engagement™, SOW-based engineering for high level consulting, on-demand support, and specific tasks within a larger project. KOTE is also best for longer term engagements without a hard deadline that can be stopped and started as necessary, and projects with an expected pause (such as bring-up of new hardware which almost always results in a re-spin of the PCB).

Partnerships and Conferences

We continue our strong relationship with the Linux Foundation and Automotive Grade Linux. We worked with mender.io and PHYTEC, providing support and development for their customers. With our friends at ICS, we presented at a joint webinar in August, Software Update Mechanisms: Selecting the Best Solution by Konsulko’s Leon Anavi and ICS’ Jeff Tranter.

Our Konsulko engineers were active participants (often in person, sometimes virtually) in conferences and developer gatherings. Leon Anavi, Vitaly and Maria Wool, and Tim Orling made presentations at the Embedded Linux Conferences (North America and Europe), FOSDEM and Yocto Project Summits:

Tim also posted a technical paper on Using kernel config fragments to remove an unwanted feature.

Two top engineers join the Konsulko team

The bar is pretty high for joining Konsulko Group. Some of our team have thirty years experience with embedded software and Linux. Most have over twenty and all have over fifteen years, working (and playing) with Linux and the open source community. So we were happy to welcome Denys Dmytriyenko and António Oliveira to Konsulko Group this year.

Denys is a long time Open Source Software developer, contributing code to many FOSS projects, like glibc, PostgreSQL, KDE, MythTV, LIRC, OpenEmbedded, and Yocto Project. Before joining Konsulko Group, he worked as Software Developer and Architect for Texas Instruments for almost 20 years on numerous Embedded Linux (MIPS and ARM-based) products. Since 2011 Denys has served on the OpenEmbedded Board of Directors, and since 2019, on the Yocto Project Technical Steering Committee. He is a long time contributor and maintainer of numerous recipes and layers in the OpenEmbedded/Yocto Project universe.

António has worked in development of highly optimized hardware and software ranging from deeply embedded microcontrollers to full-fledged graphical user interfaces. During this time, he has gained extensive experience in build automation tools, analog and digital circuits, powerline communications, and low power and low frequency radio communications. An active member of the open source community, he has contributed to Yocto Project and the Linux kernel. In addition to his work as an embedded engineer, António served eight years on the executive board of his local parish in Portugal, including four years on the municipal council.

We hope you will have the opportunity to work with Denys, António and the rest of Konsulko Group in 2023.